Transformer Leak Repair Story from Polywater®
The fast and effective repair of power transformer oil or SF6 leaks is an important part of a consistent power supply that minimize economic losses for both power utilities and their customers.
Key Takeaways
Resilient and cost-effective maintenance of the grid using innovative technologies like PowerPatch® from Polywater® helps sustain the critical systems in operation. The intrusive processes required to replace a large oil tank gasket can take twice as long and be three times costlier than the Polywater leak repair option.
 The fast and effective repair of power transformer oil or SF6 leaks is an important part of a consistent power supply that minimizes economic losses for both power utilities and their customers. Ongoing transformer maintenance programs are critical to reliable electrical power generation and services. When immediate replacement of a transformer gasket is not feasible, a fast and reliable repair solution is required on location for a gasket oil leak. The following Leak Repair Story from Polywater will describe a leak repair scenario often encountered in the field: The repair of a generating transformer bell tank gasket leak in India where Polywater® PowerPatch® Leak Repair system was used to repair oil leaks to maintain a reliable power supply.
Oil leakage problem to be resolved
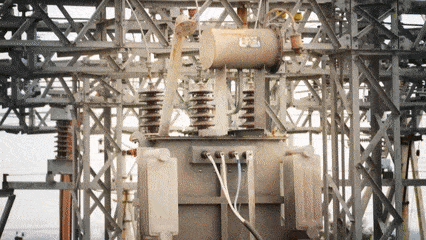
An Indian generation utility was preparing for overhauling its transformer fleet during a scheduled annual shutdown. However, oil leakage from the Bell Tank of a 260 MVA generating transformer (GT) gasket and bolts was a serious concern for its owner.
Customer repair options
The transformer owner had two options available to fix the gasket leak: gasket replacement or gasket leak repair. The former is an intrusive option as the transformer oil must be removed and the bell tank needs to be lifted to replace the gasket. The latter option, gasket leak repair, is a non-intrusive process where the leak is repaired from the outside, eliminating the need for lifting and oil removal.
In this case, the GT had provided reliable service for over a decade, but the asset manager was hesitant to expose the core of the transformer to atmospheric oxygen and moisture if traditional gasket replacement practices were to be used. It was also determined that the costs of lifting the active part of the transformer and oil treatment required for the intrusive replacement option would be high. The customer also needed to minimize the risk of opening a well operating transformer to expose it to atmospheric moisture. The chosen option for the upcoming shut-down needed to be a sealant technology that allowed for the leak to be stopped without the need for oil treatment and need to lift the bell tank.
| Related Content: The Aging of Power Transformers |
Minimum expectations/trade-offs
The Operations and Maintenance (O&M) team of the generation utility had some minimum expectations for the gasket leak repair system. These were:
- The oil leakage must be stopped completely
- The oil leakage should not reoccur for a number of years (3-5 years in most cases) OR at least up to the next planned shutdown
Past experiences
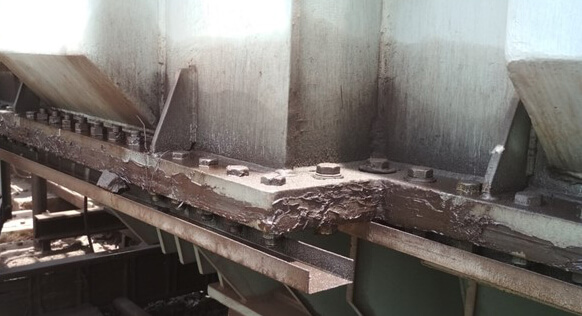
In previous years, the transformer owner had used its own repair teams to tighten the bolts on the cover of the transformer to stem the oil flow. This had been done enough times that further tightening would have been counter-productive due to the potential ageing of the gasket. The customer had also used its repair team and outside contractors in past shutdowns to stop oil leakage. Different sealant materials were used for these repairs, but they did not perform well with active gasket leaks. The most recent oil leak repair material had started to leak heavily from multiple points, so a more effective repair material needed to be identified and approved.
The generating plant’s maintenance manager had attended a transformer maintenance workshop, TRAFOCARE, where he had seen a presentation and video of how leakage can be repaired without draining transformer oil, using Polywater PowerPatch Leak Repair System. The maintenance manager approached Polywater and their local application team, LeakXpert, for a solution to seal the gasket leak.
PowerPatch Leak Repair System
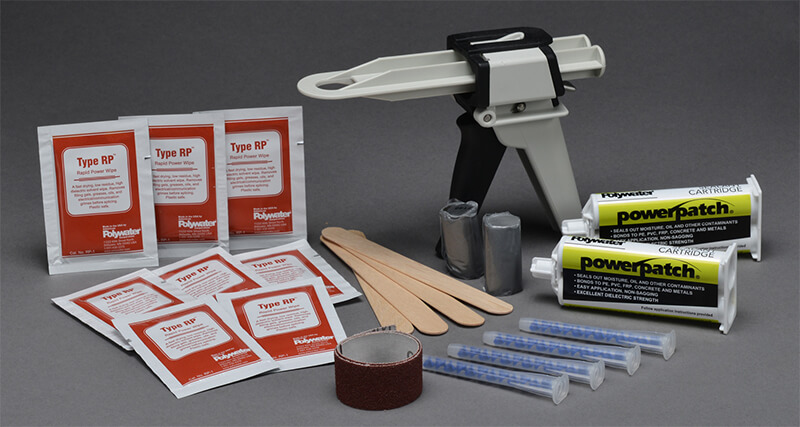
The application team first presented the capabilities of the Polywater PowerPatch to ensure that it met the requirements of the repair to be done. PowerPatch is specially formulated for use with high-voltage electrical equipment. This advanced sealant is based on multi-polymer technology and is used to repair both oil and SF6 leaks. It offers the physical and electrical characteristics required in generating plant operations.
Below are some of the features of PowerPatch that made it the right leak repair technology for this application:
- PowerPatch has dielectric properties similar to other components inside the transformer, such as oil and solid insulation. This compatibility reduces the risk of partial discharge and its damaging effects on transformer performance.
- Flexible and easily removed – the PowerPatch allows for the expansion and contraction caused by frequent load changes and vibrations common for Its high adhesion to the repaired surface resists pressures up to 1.4 MPa on steel to withstand these high mechanical forces. Although strong, it can be easily removed if used as a short- term repair.
- PowerPatch is resistant to weathering such as UV exposure and to temperature It has been environmentally aged in extreme conditions, including rain, snow, sleet, and UV with an in-use temperature range of -40 °C to 150 °C (-40 °F to 300 °F).
| Related Content: Mapping Transformer Populations |
These features of PowerPatch met the requirements that the transformer owner needed to ensure reliable power production. But, before making the final decision if PowerPatch was the right choice for the gasket repair, an on-site visit to assess the transformer’s physical surroundings was requested.
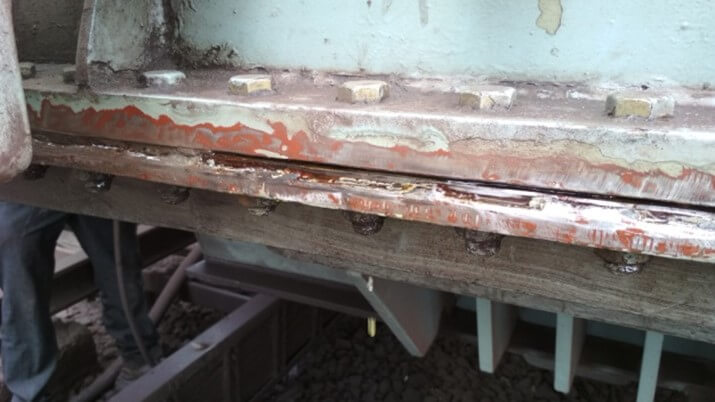
Each transformer oil leak is different. Many transformer bell-tank perimeters can be as long as 18 meters (60 ft.) in length and can contain over 200 bolts. When repairing a gasket leak, the entire length of the gasket must be sealed. If only the oil leak area is sealed, the oil can migrate to unsealed areas and leak again. The bolts holding the tank tightly to the transformer must also be sealed. If not, once the tank’s full perimeter is sealed, the oil will follow through the path with the least resistance and start to leak through the bolt threads.
With these issues in mind, the LeakXpert team visited the generating plant to survey the transformer to determine the amount of sealant required and to assess any points of limited physical access to the area to be sealed. The repair team found some areas behind marshalling boxes that would make the application of the sealant difficult. The LeakXpert team informed the customer about these areas, and the customer agreed to remove the boxes before the gasket repair began. The visit also revealed that the previously applied sealant would require much time and effort to remove.
 Removal of previous sealant material
Before the repair process could start, the leaking sealant material that was previously applied had to be removed. In many cases, this removal process is the most time-consuming part of a gasket repair. Various materials have been used in the past that are difficult to remove. These range from rubberized materials to hard resin compounds. They all must be scraped off with chisels or grinding wheels, a physically demanding task, which often leaves residual materials on the repair surface that then must be removed with strong cleaning solvents. This makes PowerPatch’s removability an advantage if used as a temporary seal on a transformer awaiting replacement parts.
The LeakXpert team removed the old material from the GT over two days. Once removed, the surface was wiped clean with an environmentally friendly cleaner. It was then time to start the PowerPatch application procedure.
The repair process
The application process to seal the bell tank leak is very important. Migration of oil along the path of least resistance is very common. To minimize this problem, instead of starting the repair process at points of the active leak, non-leaking lengths of the tank’s perimeter and bolts are sealed first. Then lengths adjacent to these non-leaking areas are sealed. This process continues, moving closer and closer to the points of active leakage. Once the active leak point is reached, it is sealed. This sealing process ensures that the leak will be completely repaired, preventing the oil from migrating to unsealed areas along the perimeter of the tank.
Surface preparation
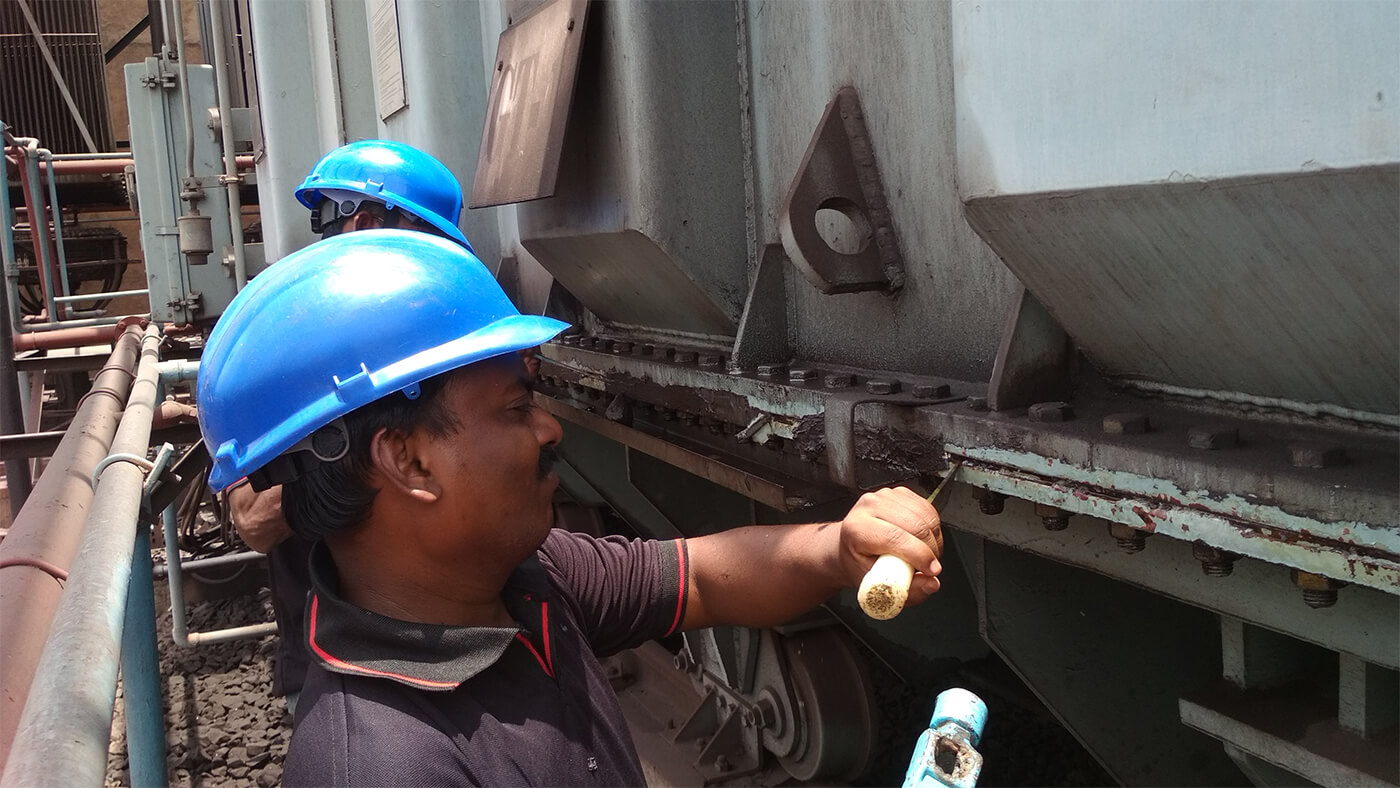
Once the previously applied material was removed, the steel surface on which the PowerPatch was to be applied needed to be sanded and wiped clean. This step’s goal was to remove paint and contamination that can reduce adhesion of PowerPatch to the repair area. In addition, the sanding or grinding of the metal surface helps to increase the surface area to which the PowerPatch adheres, giving the seal greater strength. In many gasket repairs, the leak appears to arise from one point when the origin of the gasket leak may be quite far away. Polywater’s experienced repair team, LeakXpert, used the surface preparation step to distinguish areas of active leaks containing true points of leakage from those that did not.
 Sealing non-active areas
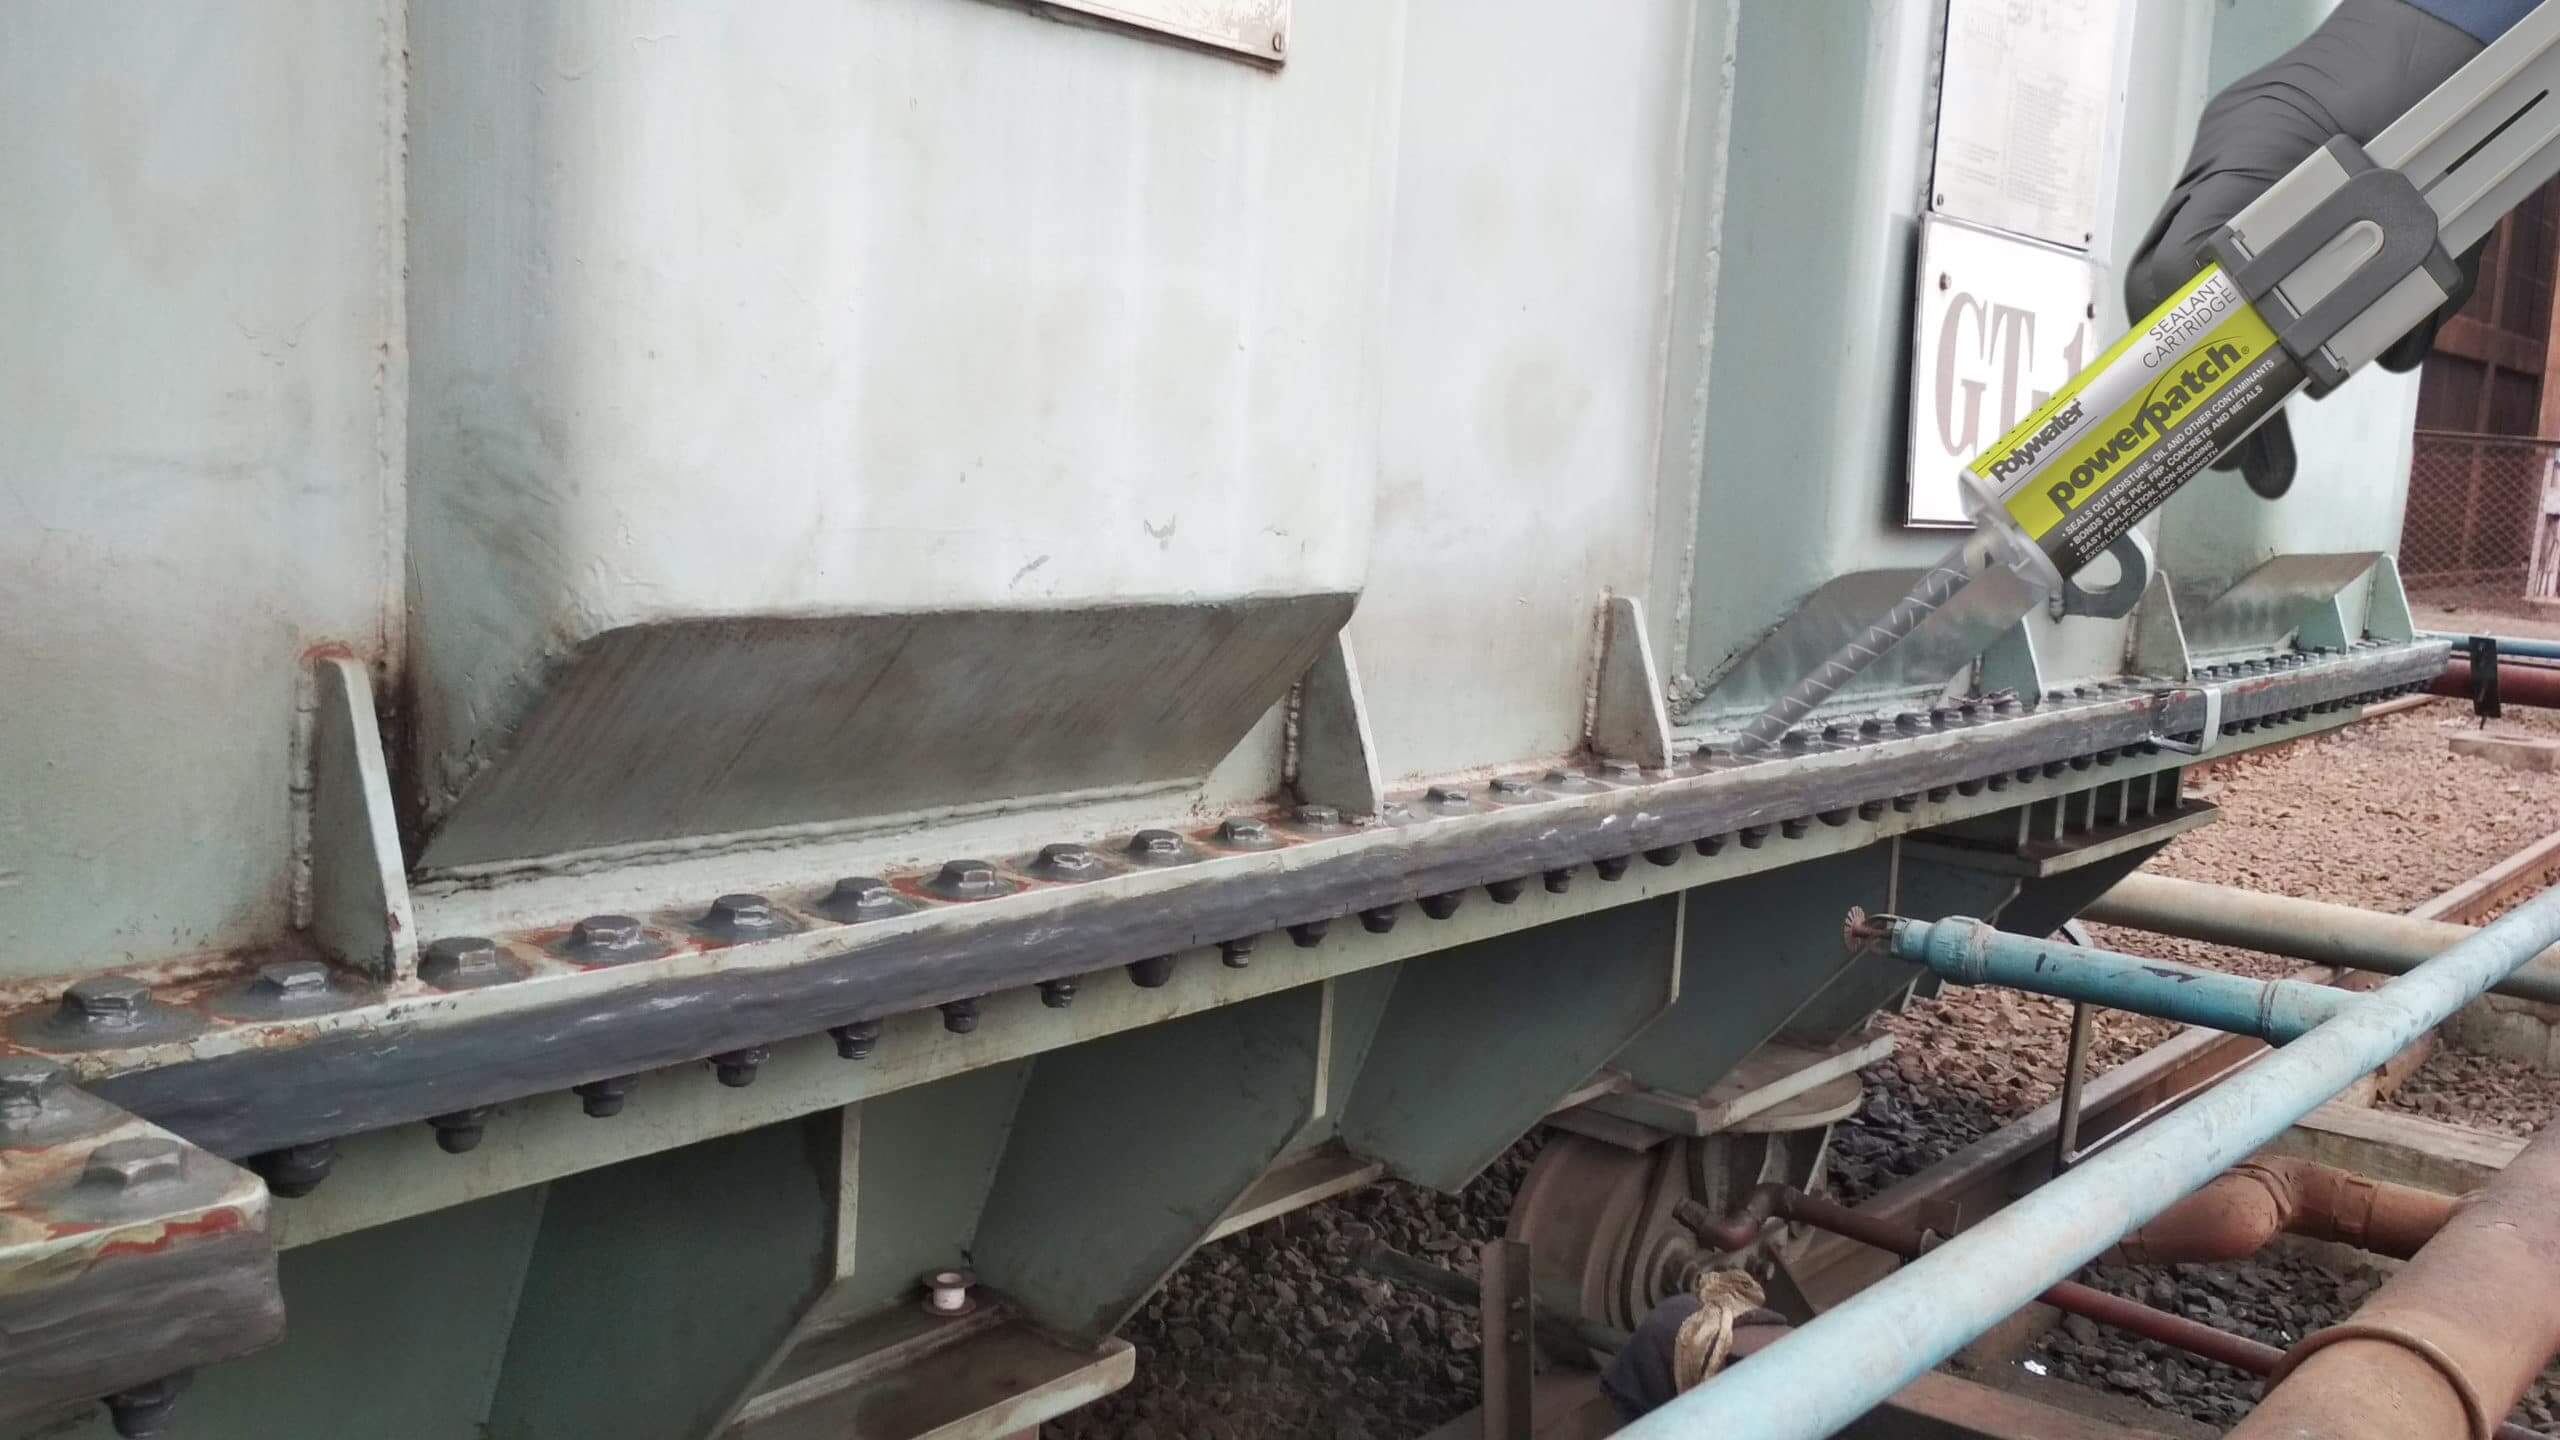
The steps required in the application of PowerPatch depend on the type of leak, active or non-active. In a typical gasket leak repair, most of the main tank perimeter does not have active leakage, but there is often the oil that has migrated from actively leaking areas. The process for sealing non-active leaks is easier than for active leaks. Any oil accumulated in non-active leak areas must be cleaned, and then the permanent PowerPatch resin should be applied directly onto the metal of the transformer. This process should be done repeatedly at lengths of 2-3 meters (6-10 ft.) until approaching an active leak area. The permanent PowerPatch resin has strong adhesion to the metal surface and cures quickly. A functional cure can be reached with- in one hour after application at 20 °C (68 °F).
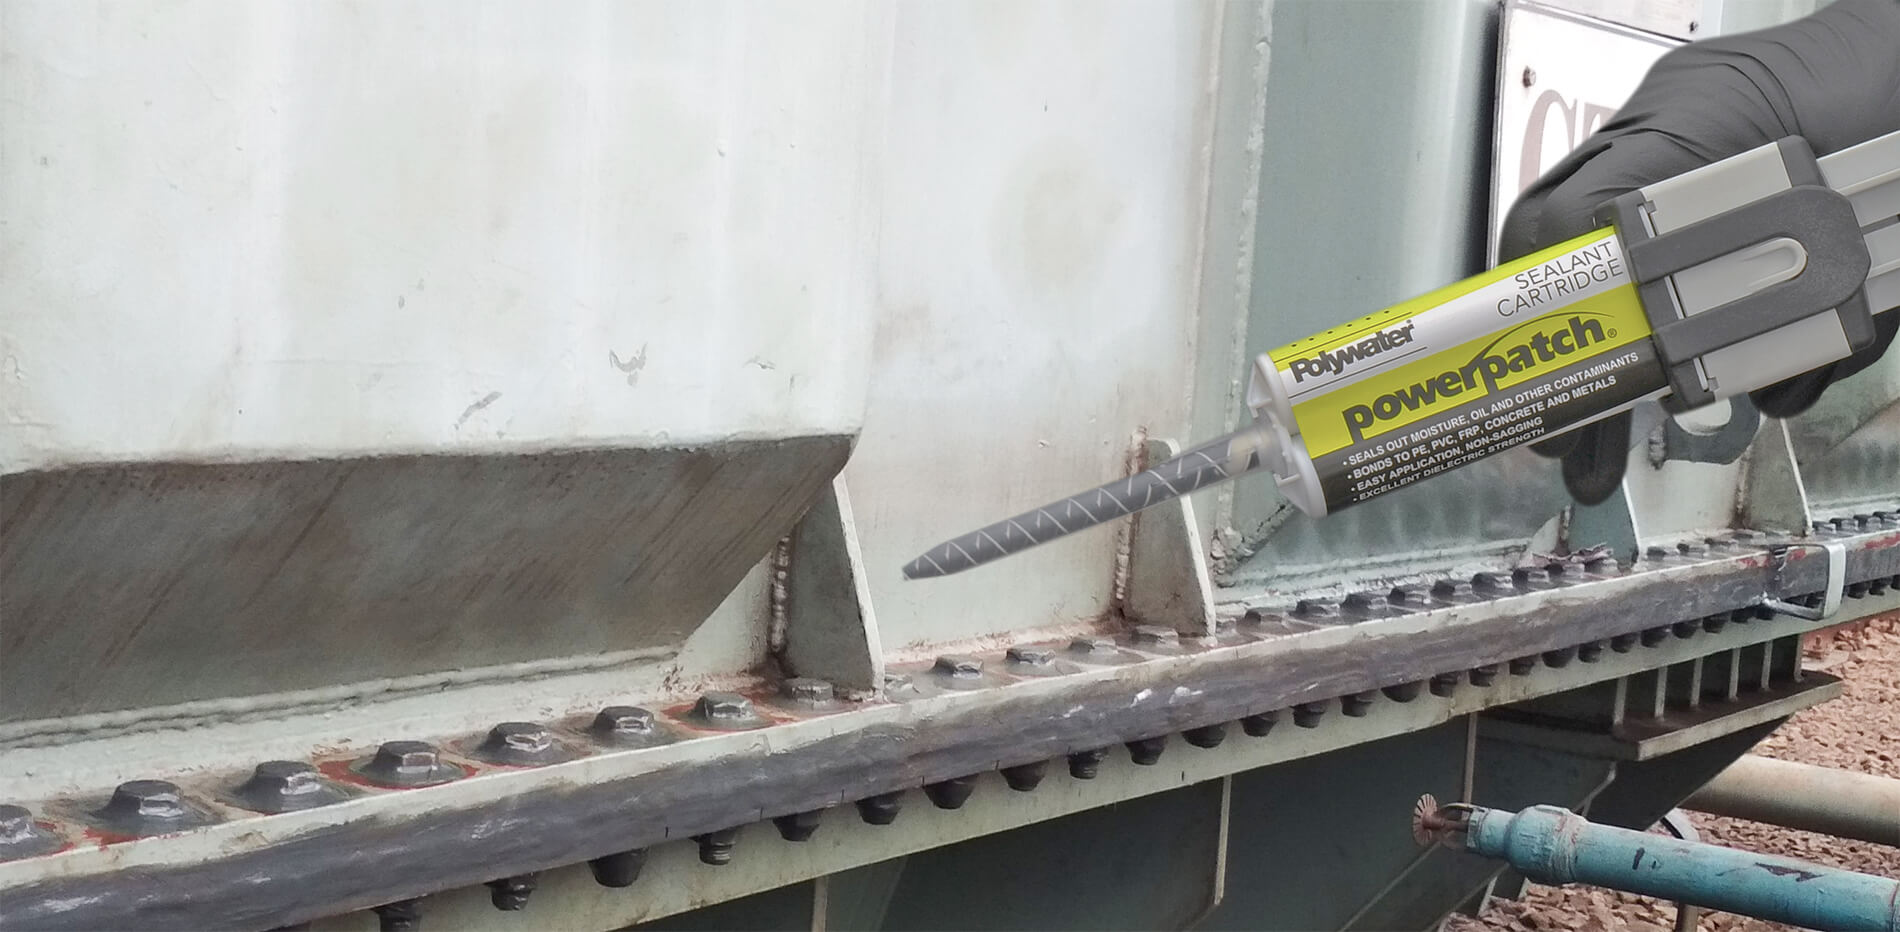
PowerPatch Repair Sealant – the PowerPatch two-part permanent repair resin was applied from a cartridge and mixing nozzle in this repair. The application tool was used to inject resin components from the cartridge into the mixing nozzle. In the nozzle, they are accurately metered and thoroughly mixed to ensure reliable sealing performance. Unlike other sealants that require proportion measurement and hand-mixing, all PowerPatch packages are premeasured to offer consistent curing times, strength and durability for excellent sealing results.
| Related Content: How Oxygen and Acids Influence the Aging of Transformers |
Sometimes it is difficult to know if the presence of oil is a result of an active leak or oil migration from another leak area. In the case of the gasket repair on the GT, the LeakXpert team was not sure of the source of the oil on certain spots of the tank perimeter. In these areas, they used the repair process for active leaks described below.
 Sealing active leaks
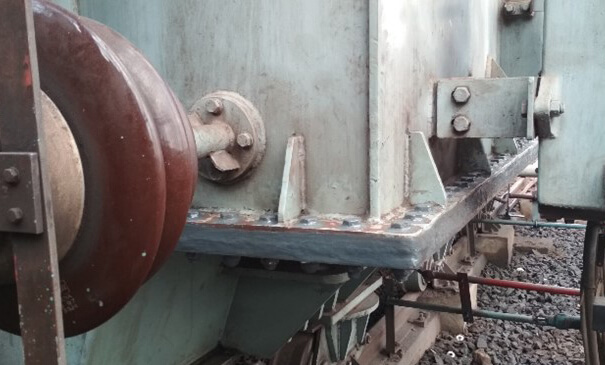
Active leaks can be detected as seepage accumulating on the surface of the trans- former or as droplets of oil falling from the leak area. In the Surface Preparation photo (Step 1), droplets of oil can be seen dripping from the prepared surface. Once adjacent non-leaking areas have been sealed, active leakage points are now ready to be repaired.
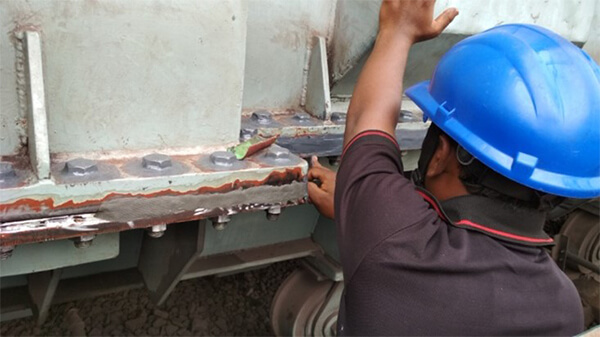
Sealing active leaks takes an additional step. This step aims to stop the active leak to allow for proper surface preparation and the application of the permanent PowerPatch material as described in the previous section. After abrasion and cleaning the leak area, a fast-curing putty is applied directly over the active leak and held under hand-pressure until it hardens. This takes typically 5-7 minutes, depending on temperature. Once hardened, surface preparation is done again, including sanding, grinding and cleaning around the putty. When properly prepared and cleaned, the permanent PowerPatch resin is applied directly over the putty and then spread one (1) cm (0.4 in.) beyond the edges of the putty at all points. When the PowerPatch resin hardens and cures, it forms a strong and durable seal.
 The repair of an active leak can be difficult, especially for inexperienced repair teams. The LeakXpert team’s extensive experience using PowerPatch putty and the permanent PowerPatch sealant to stop active leaks allowed for the GT gasket to be sealed quickly and efficiently. More importantly, the PowerPatch offered an un-intrusive alternative to traditional gasket replacement that required less time and money.
| Related Content: Mapping as Risk and Cost Assessment Methodology |
Summary
Resilient and cost-effective maintenance of the grid using innovative technologies like PowerPatch from Polywater helps sustain the critical systems in operation. The GT’s owner opted for PowerPatch because of its ability to withstand mechanical expansion/contraction and its high dielectric strength matching the electrical properties of the other components within the transformer. The intrusive processes required to replace a large oil tank gasket can take twice as long and be three times costlier than the Polywater leak repair option. The Polywater PowerPatch Leak Repair System used by LeakXpert in the repair of the GT was less time consuming, less expensive than conventional gasket replacement and did not expose the core to atmospheric gases and moisture.
Have any questions?
Originally published in Transformers Magazine, Volume 8, Issue 2, 2021